Introduction
A finished basement can double your usable square footage, if it’s organized. Good storage keeps clutter at bay and makes it easy to find what you need. Whether you’re finishing the entire basement or just sprucing up a corner, this guide covers ten basement storage ideas. From under‑stairs closets and built‑in cabinets to ceiling racks and wine cellars, you’ll see real photos, cost ranges and tips for moisture management, permits and future access. Let’s get organized.
What counts as basement storage?
Basement storage solutions range from simple shelving units to built‑in cabinets and closets. Any design that creates order by containing items in bins, drawers, racks or cubbies counts. When planning, consider headroom, moisture levels, access to mechanical systems and building code requirements. Basements used as living space may need proper ceiling heights, ventilation and egress windows. Storage installations should not block electrical panels, sump pumps or HVAC access.
10 basement storage ideas (with photos)
1. Under‑Stairs Closet
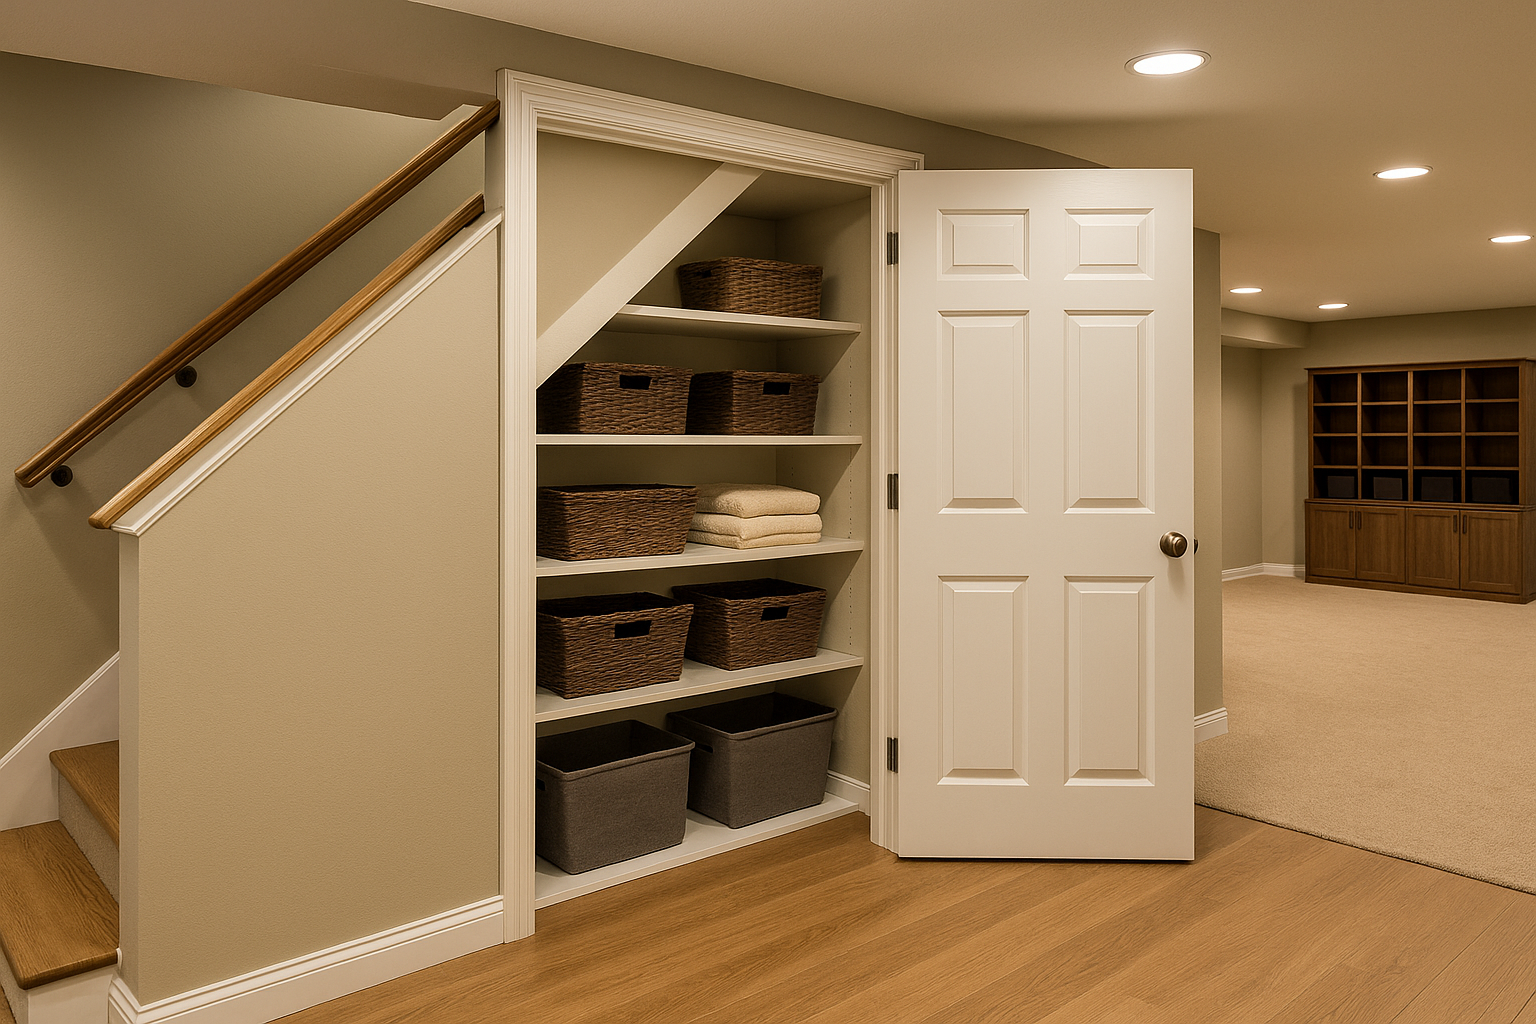
Why it works: Staircases create odd‑shaped cavities that are often wasted. Framing in a small closet under the stairs turns that dead space into shelves for seasonal décor, sports gear or extra linens. A simple door hides clutter, while adjustable shelves maximize every inch. You can even run a rod for coats or hang hooks inside the door.
Cost & considerations: Materials (framing lumber, drywall, door, shelving) may cost $500–$1,500. This storage solution is often part of a larger basement remodel; finishing an entire basement typically runs $40,000–$100,000 in U.S. markets. A closet under the stairs usually doesn’t need its own permit, but check local codes if you add lighting or outlets.
2. Built‑In Cabinets & Drawers
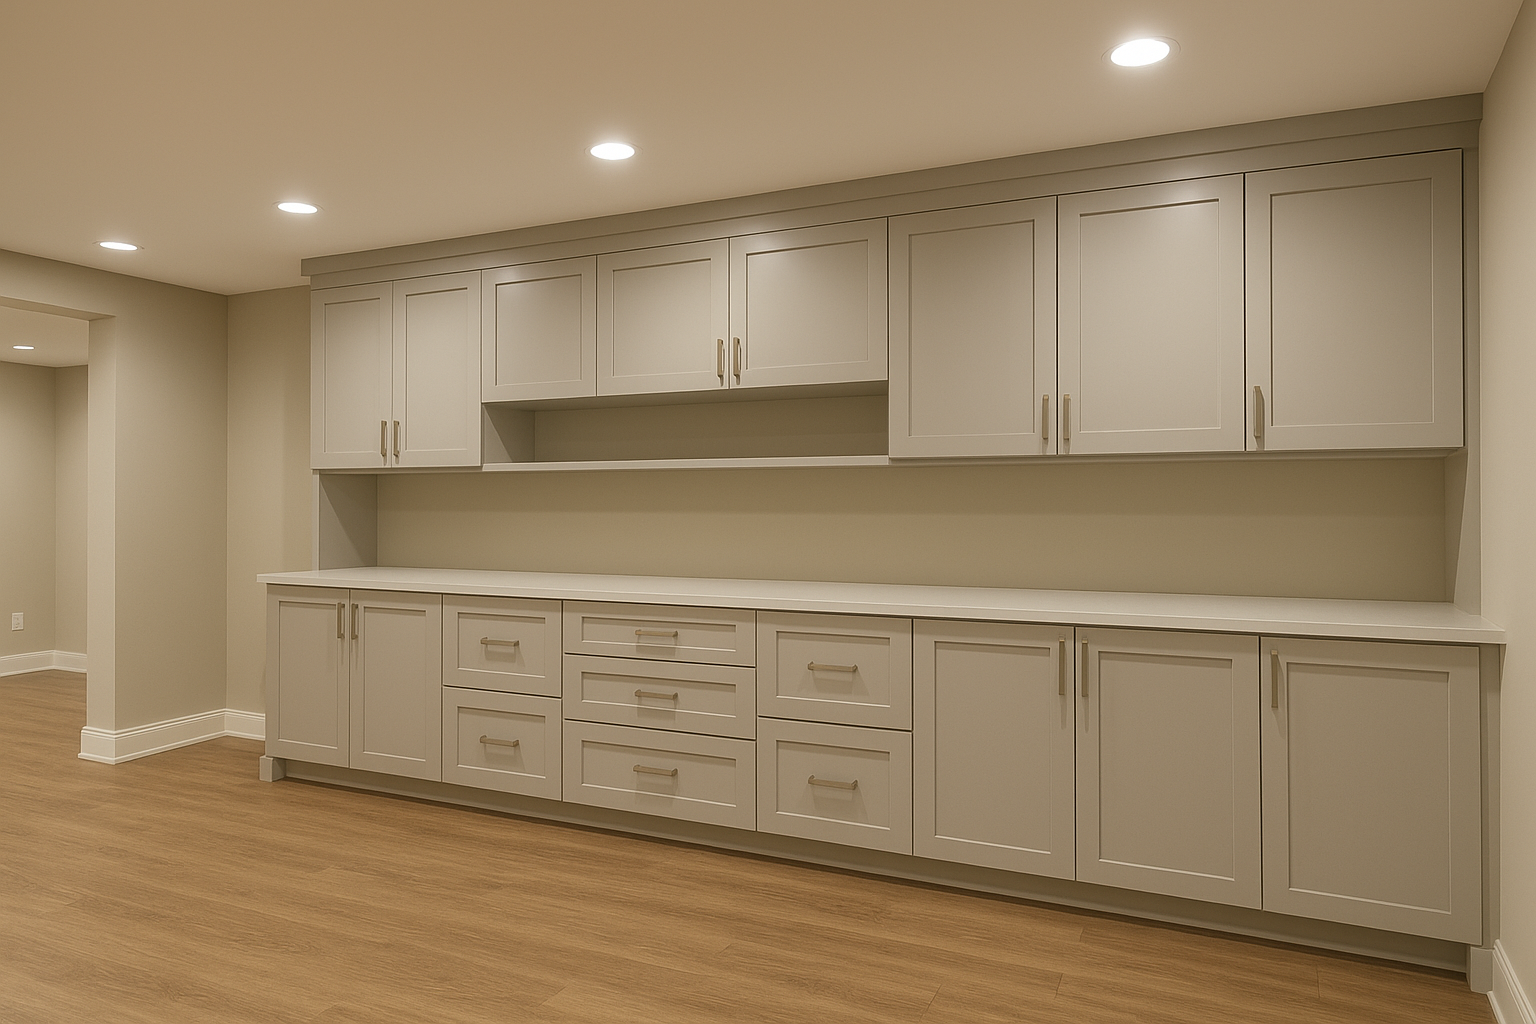
Why it works: Cabinetry turns an empty wall into a wall of storage. Upper cabinets hide board games, holiday dishes or craft supplies; deep drawers hold blankets and toys. Add a countertop to serve as a folding station or project work surface. Choose simple shaker doors for a classic look or flat panels for modern style.
Cost & considerations: Expect to pay $250–$600 per linear foot for built‑in cabinets. Stock cabinets cost less; custom cabinetry costs more. Labor represents around half of most home improvement projects, so DIY assembly can save money if you’re handy. Make sure the wall can support the weight and leave access to shut‑off valves or electrical panels.
3. Floating Shelves
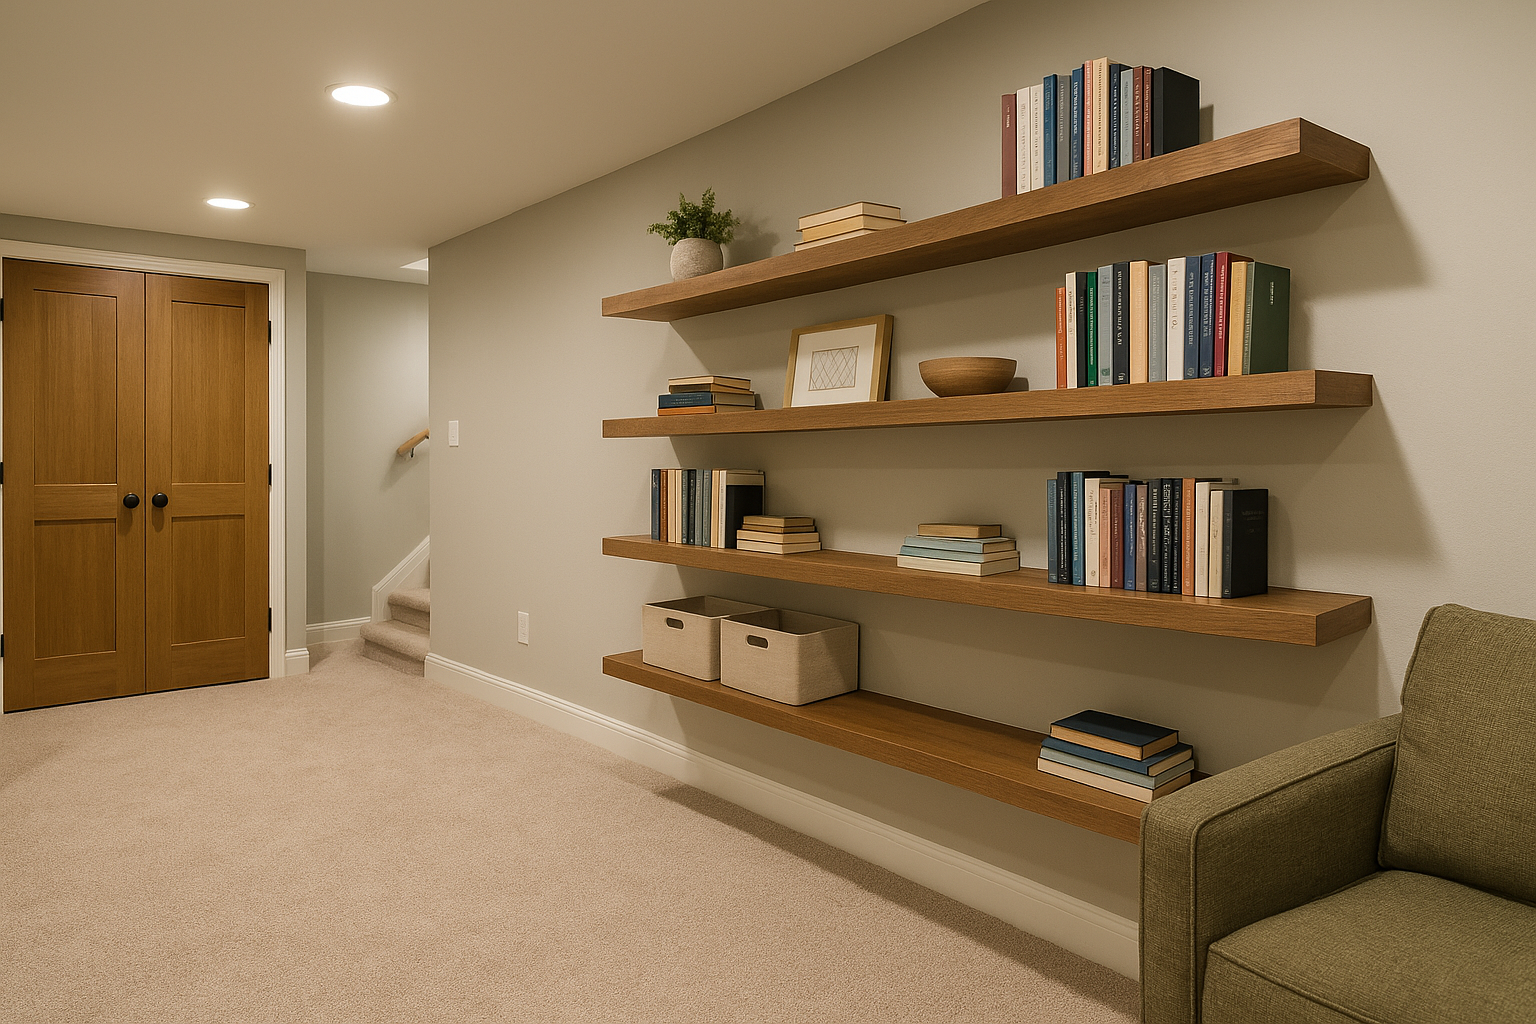
Why it works: Floating shelves provide storage without bulky brackets. They’re perfect for displaying books, artwork or baskets while keeping the floor clear. Arrange multiple shelves for a built‑in look or stagger a few for visual interest. Use thick wood or engineered panels to support heavier items.
Cost & considerations: Pre‑made floating shelves start around $20 each; custom shelves cost more. Install using heavy‑duty anchors into studs. Avoid overloading them—most can hold about 15–20 pounds per stud. This solution is best for walls free of moisture; if your basement has humidity issues, treat them first.
4. Storage Bench or Window Seat
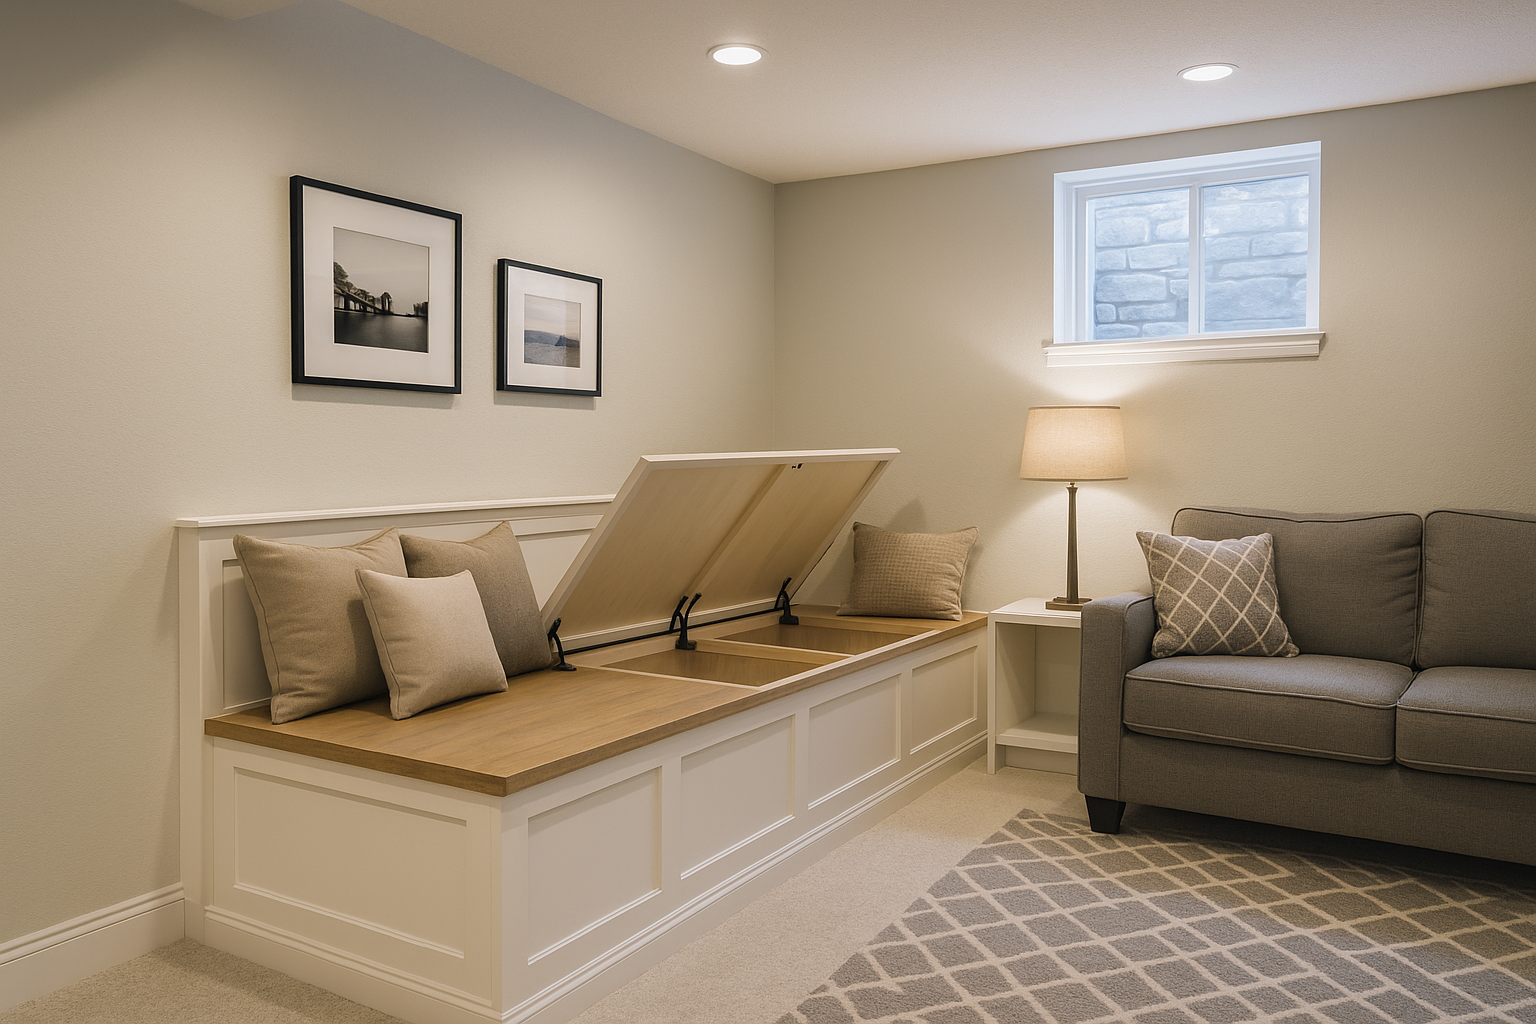
Why it works: A bench with a lift‑up lid offers two functions: seating and hidden storage. Place it under a window or along a blank wall. It’s ideal for blankets, toys or rarely used items. Add cushions and pillows for comfort. You can even build drawers or baskets underneath for easier access.
Cost & considerations: A basic built‑in bench costs $300–$800 in materials. Factor in carpentry labor or weekend DIY time. Ensure lids have soft‑close hinges to prevent finger pinches. Leave clearance around the bench to fully open lids and avoid blocking nearby furniture or pathways.
5. Overhead Ceiling Racks
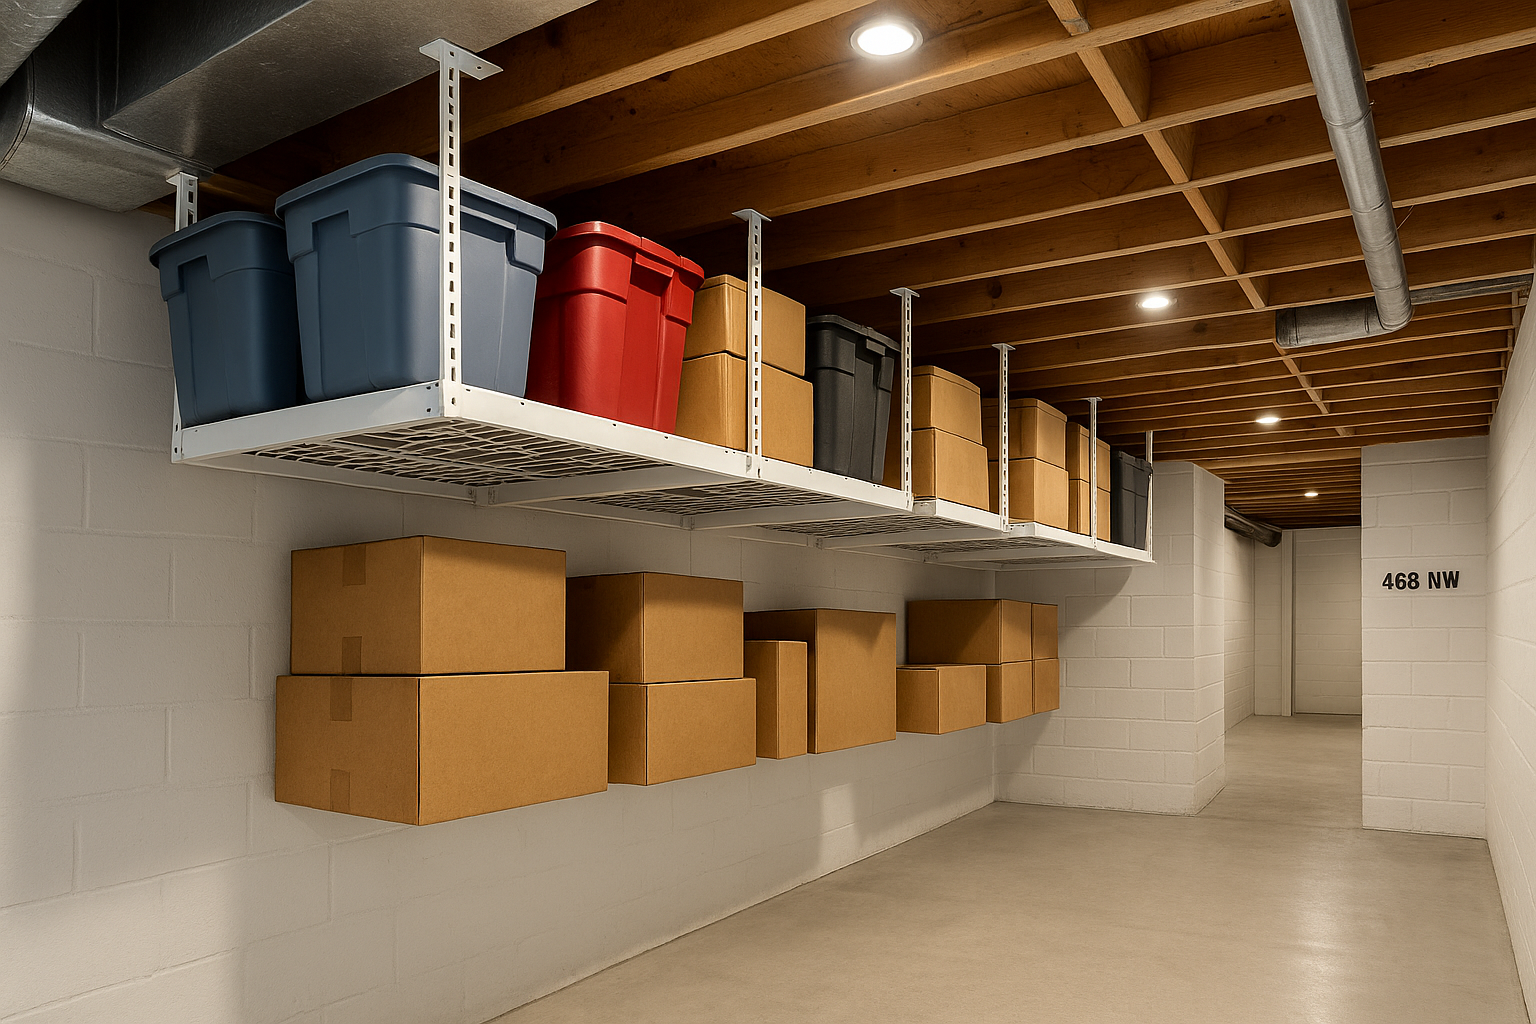
Why it works: Ceiling‑mounted racks free up floor space by using the area above your head. They’re perfect for storing seldom‑used items like holiday decorations, camping gear or off‑season clothing. Choose metal shelves with adjustable brackets and secure them into ceiling joists to handle the load.
Cost & considerations: Overhead racks start at $50–$150 per unit. Check the manufacturer’s weight limit—many handle 250 pounds or more when properly installed. In basements with low ceilings, ensure that racks don’t reduce headroom below code minimums (usually around 7 feet). Be mindful of overhead pipes or ductwork.
6. Wire Shelving & Clear Bins
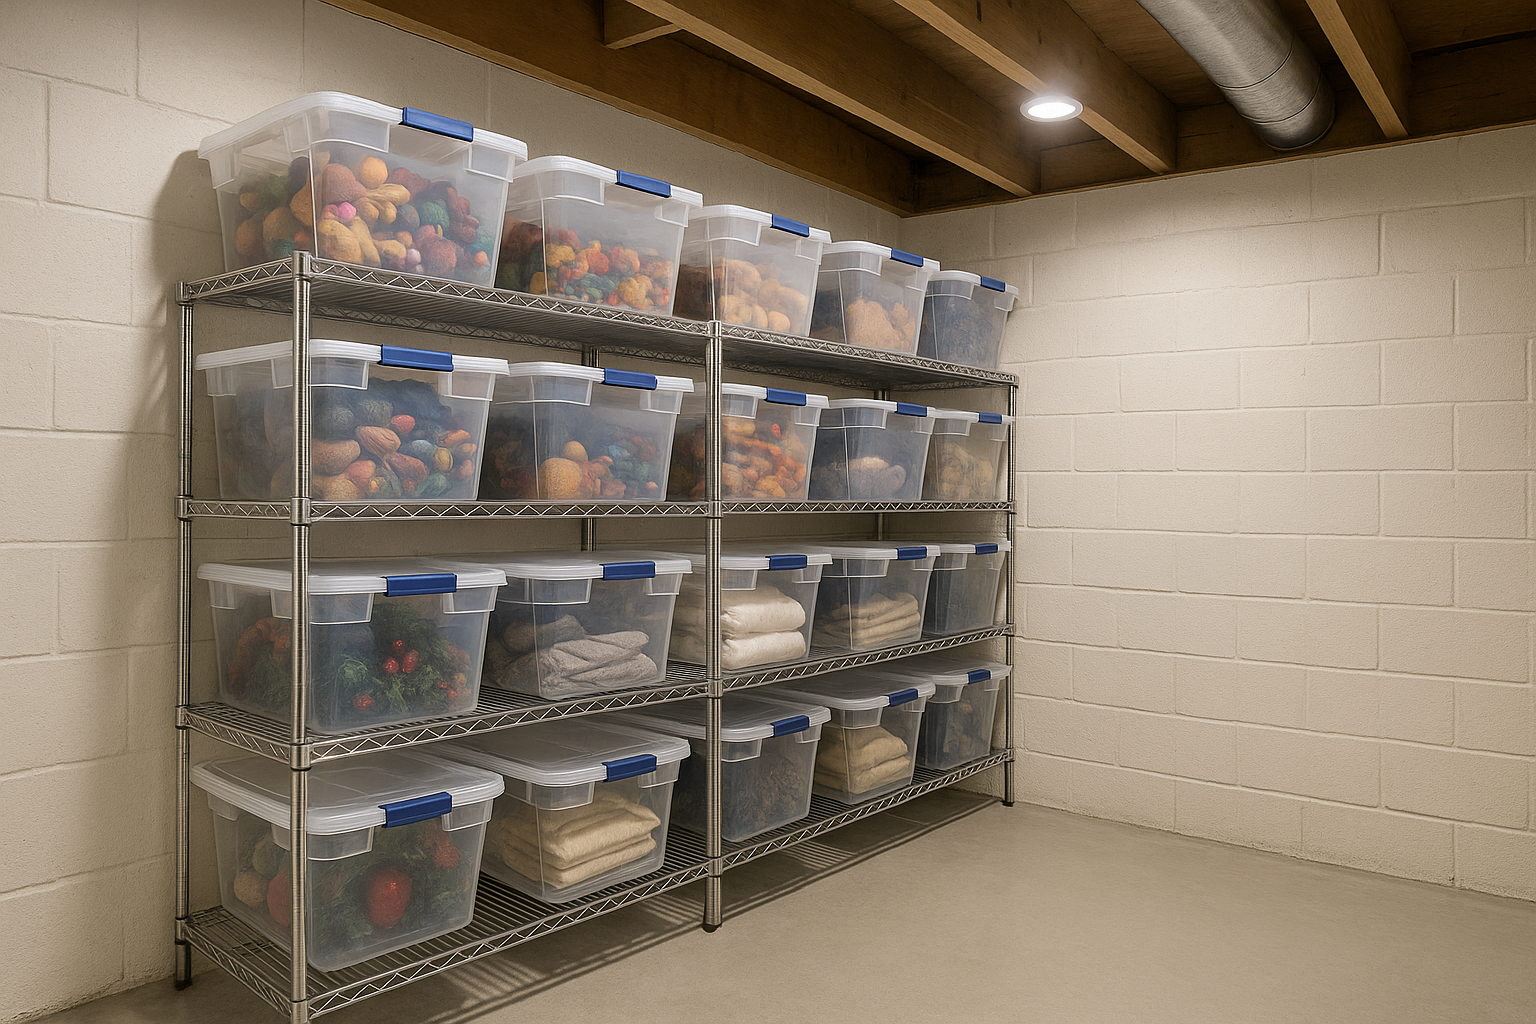
Why it works: Wire racks are sturdy, affordable and easy to reconfigure. Pair them with clear plastic bins so you can see what’s inside without opening every container. Label bins with seasonal décor, winter clothing or kids’ toys. Wire shelving allows air to circulate, which helps prevent mold in damp basements.
Cost & considerations: A 5‑shelf wire rack costs $50–$150. Clear bins run $5–$20 each. Keep heavy items on the bottom shelves and secure racks to the wall to prevent tipping. If your basement has moisture, place a vapor barrier or moisture‑resistant flooring to protect stored items.
7. Pegboard Tool Wall
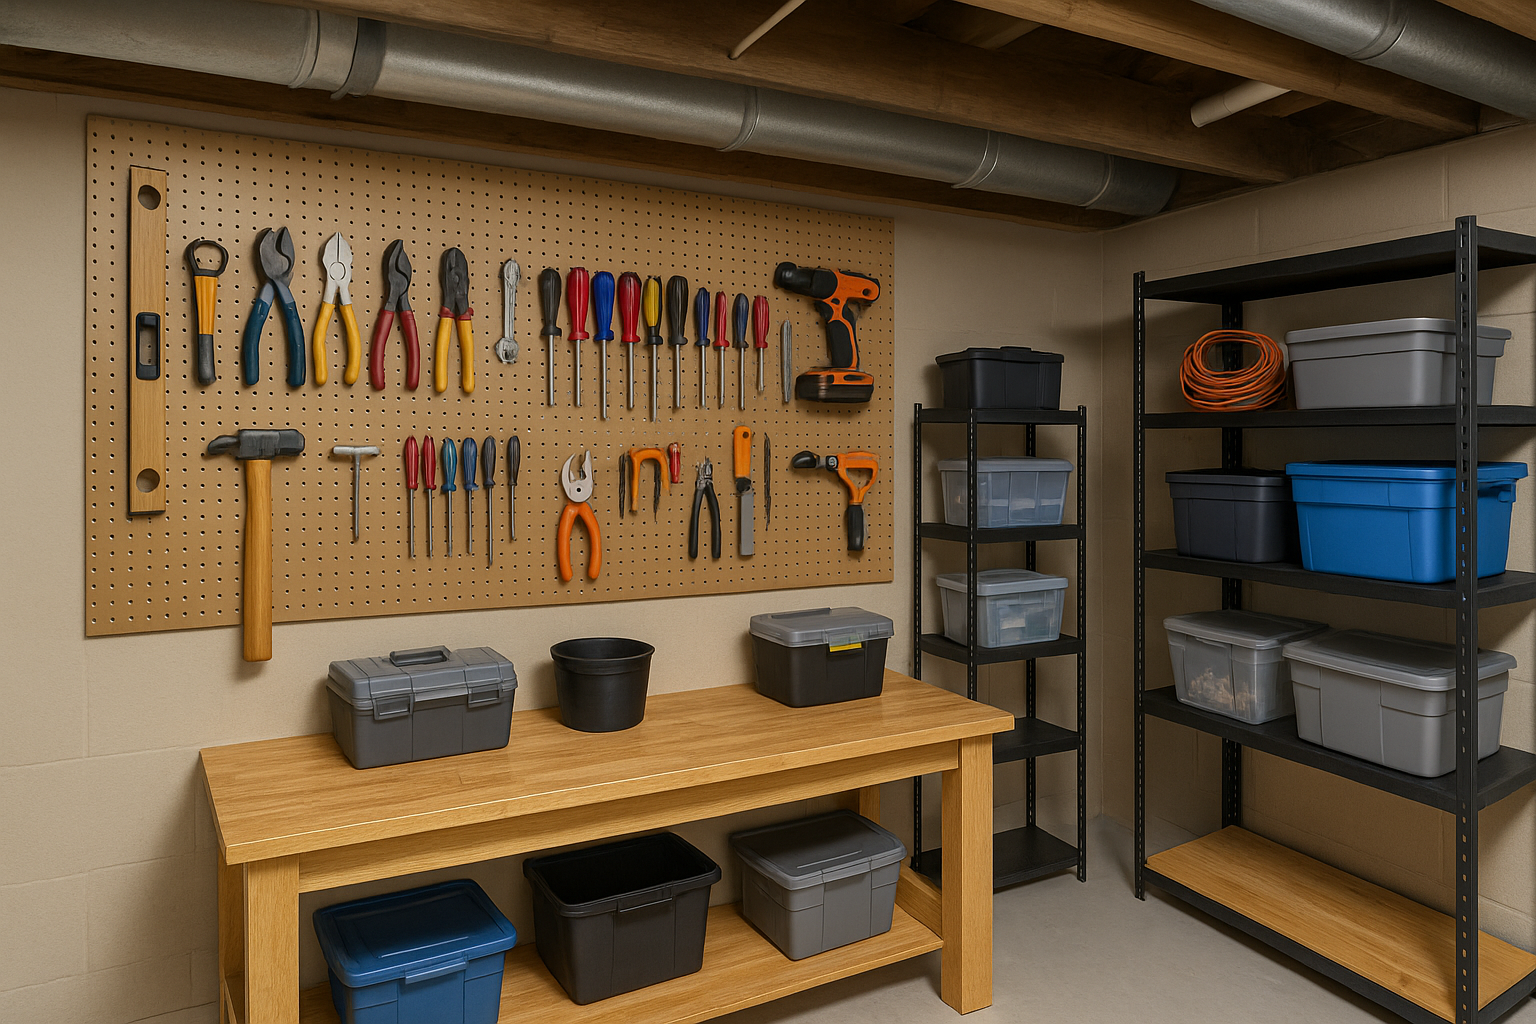
Why it works: A pegboard transforms a blank wall into a customizable tool storage system. Hang hammers, drills, screwdrivers and garden tools; add baskets for screws and nails. It keeps everything within reach and off the floor, perfect for DIYers and hobbyists. Pegboard also works for craft supplies, wrapping paper or sports equipment.
Cost & considerations: A 2×4‑foot pegboard panel costs around $10–$20. Hooks and baskets vary by type. Attach pegboard to furring strips or directly into studs. For heavier tools, use plywood behind the pegboard for extra strength. Add task lighting for work areas.
8. Mudroom Lockers & Cubbies
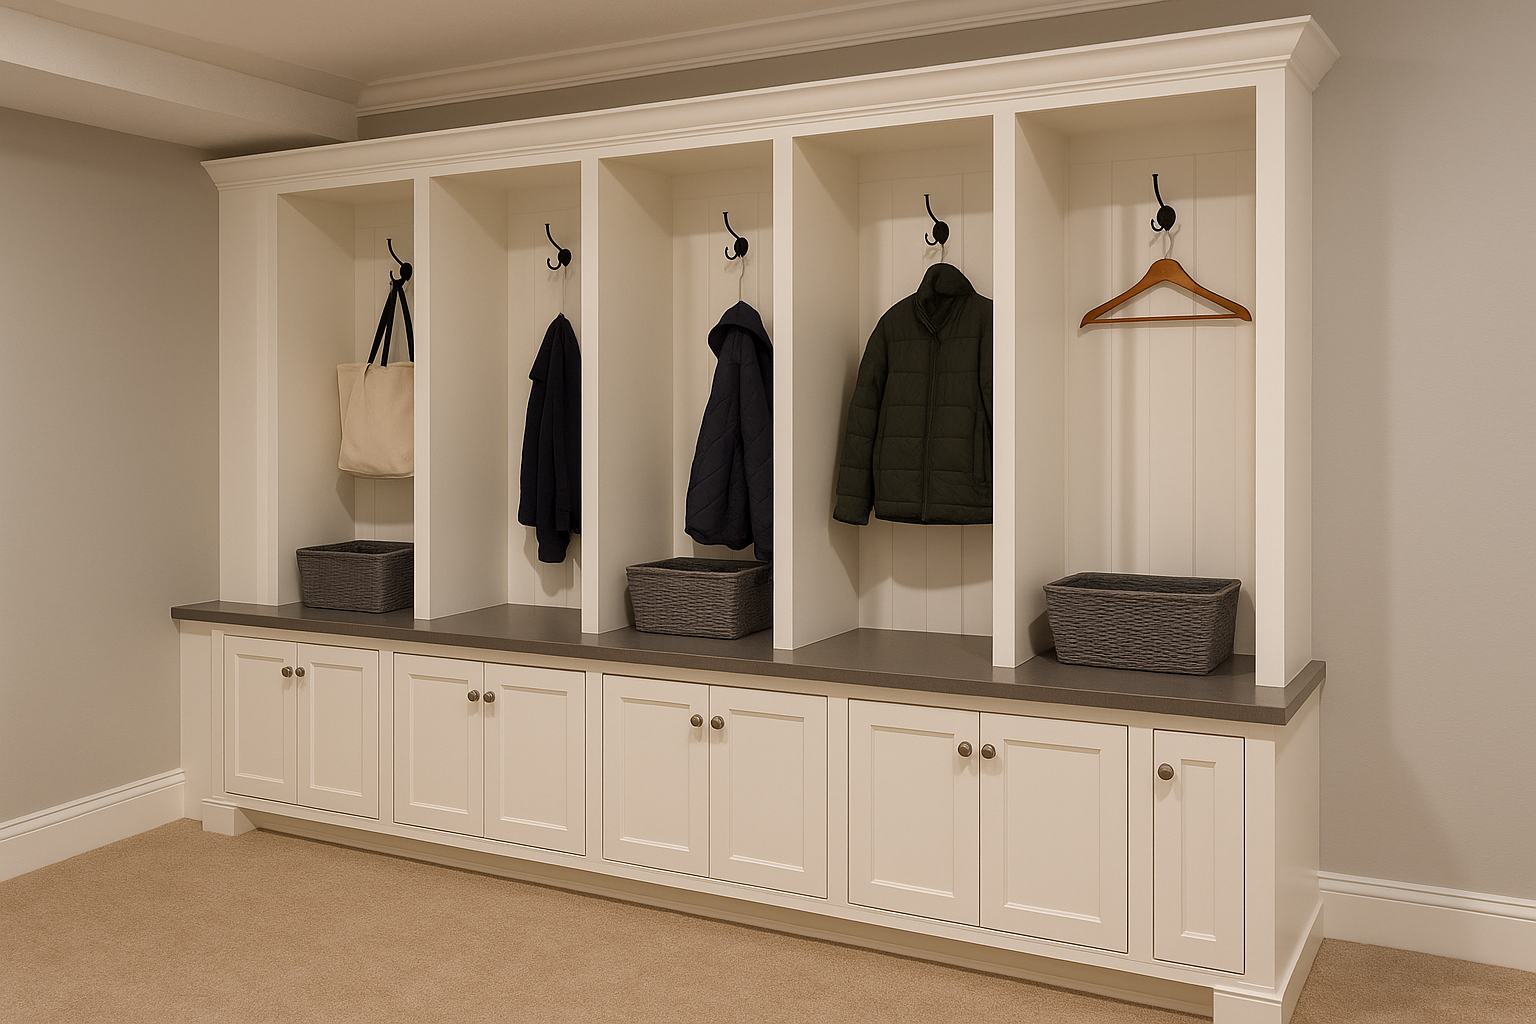
Why it works: Turning part of your basement into a mini mudroom helps keep the rest of the house tidy. Tall cubbies with hooks give each family member space for coats, bags and backpacks. Lockers with doors hide messes, while open cubbies encourage kids to put items away. Storage benches below provide seating for removing shoes.
Cost & considerations: Expect to pay $500–$1,500 for a basic locker system; custom millwork costs more. Use moisture‑resistant materials and seal wood surfaces to prevent warping. If your basement serves as a walk‑out entry, make sure to include a durable, washable mat and a place for wet boots.
9. Bike & Sports Equipment Wall
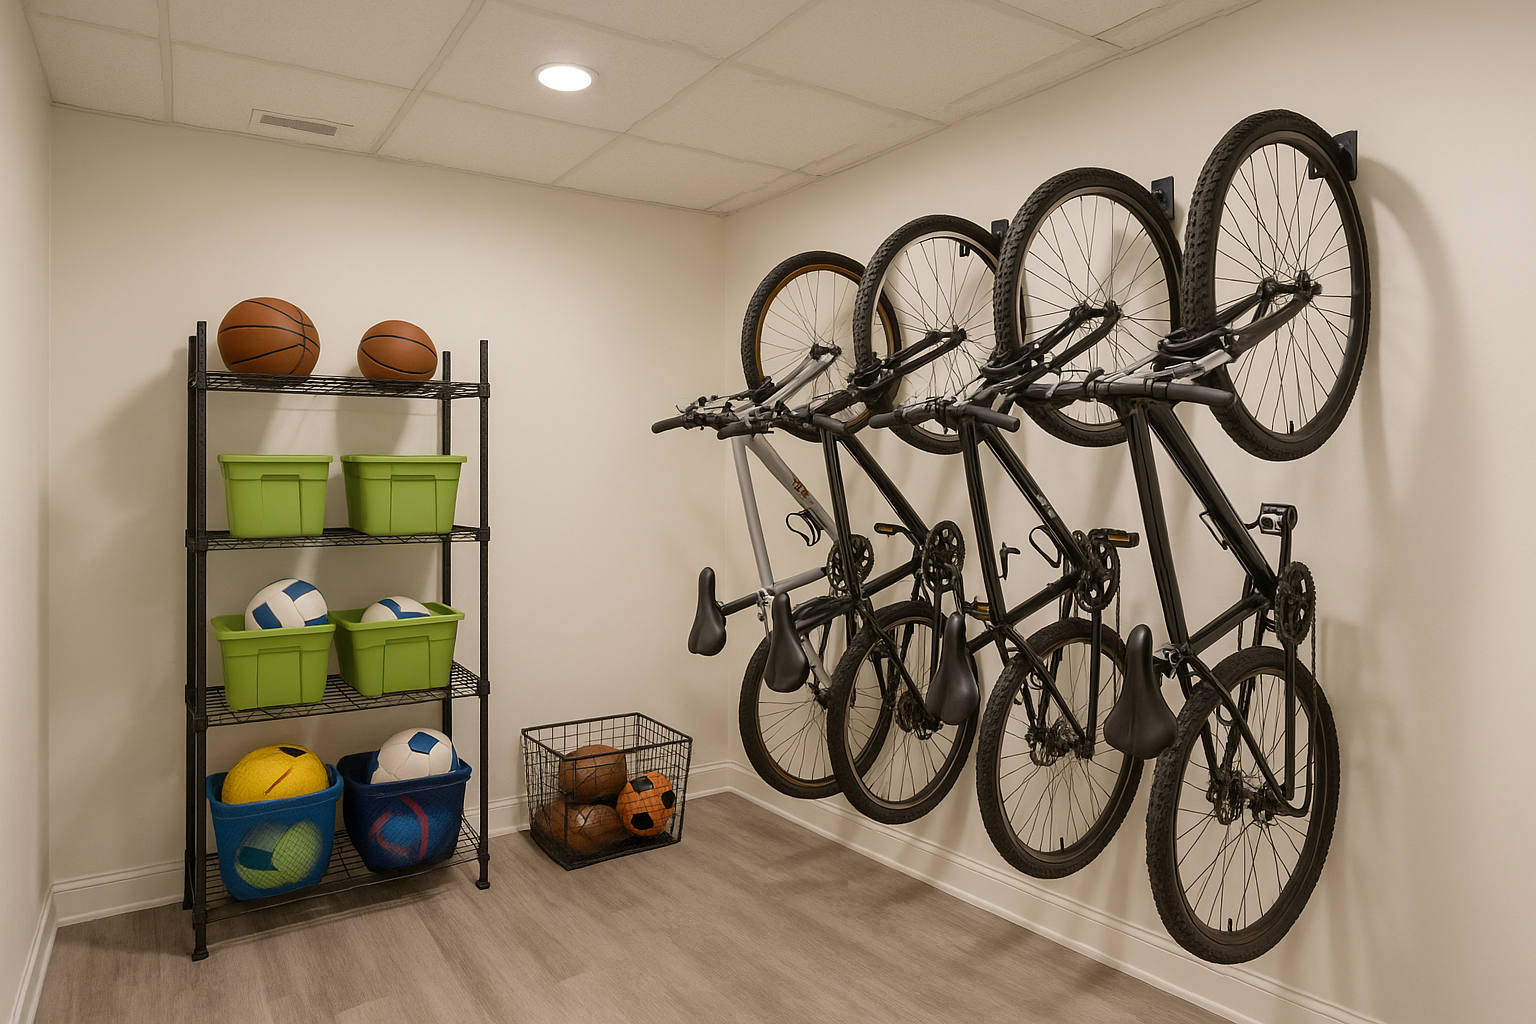
Why it works: Bikes and balls can quickly take over a basement. Wall‑mounted hooks or vertical racks store bikes upright, freeing floor space for workouts or kids’ play areas. Nearby shelves or baskets corral balls, bats and helmets. This setup keeps gear visible and accessible.
Cost & considerations: Bike hooks start around $15 each; multi‑bike racks cost $50–$200. Secure racks into wall studs for safety. Use adjustable shelves or bins for balls and helmets. If you plan to hang heavy bikes, confirm that your walls are masonry or add blocking behind drywall.
10. Wine Cellar & Pantry Storage
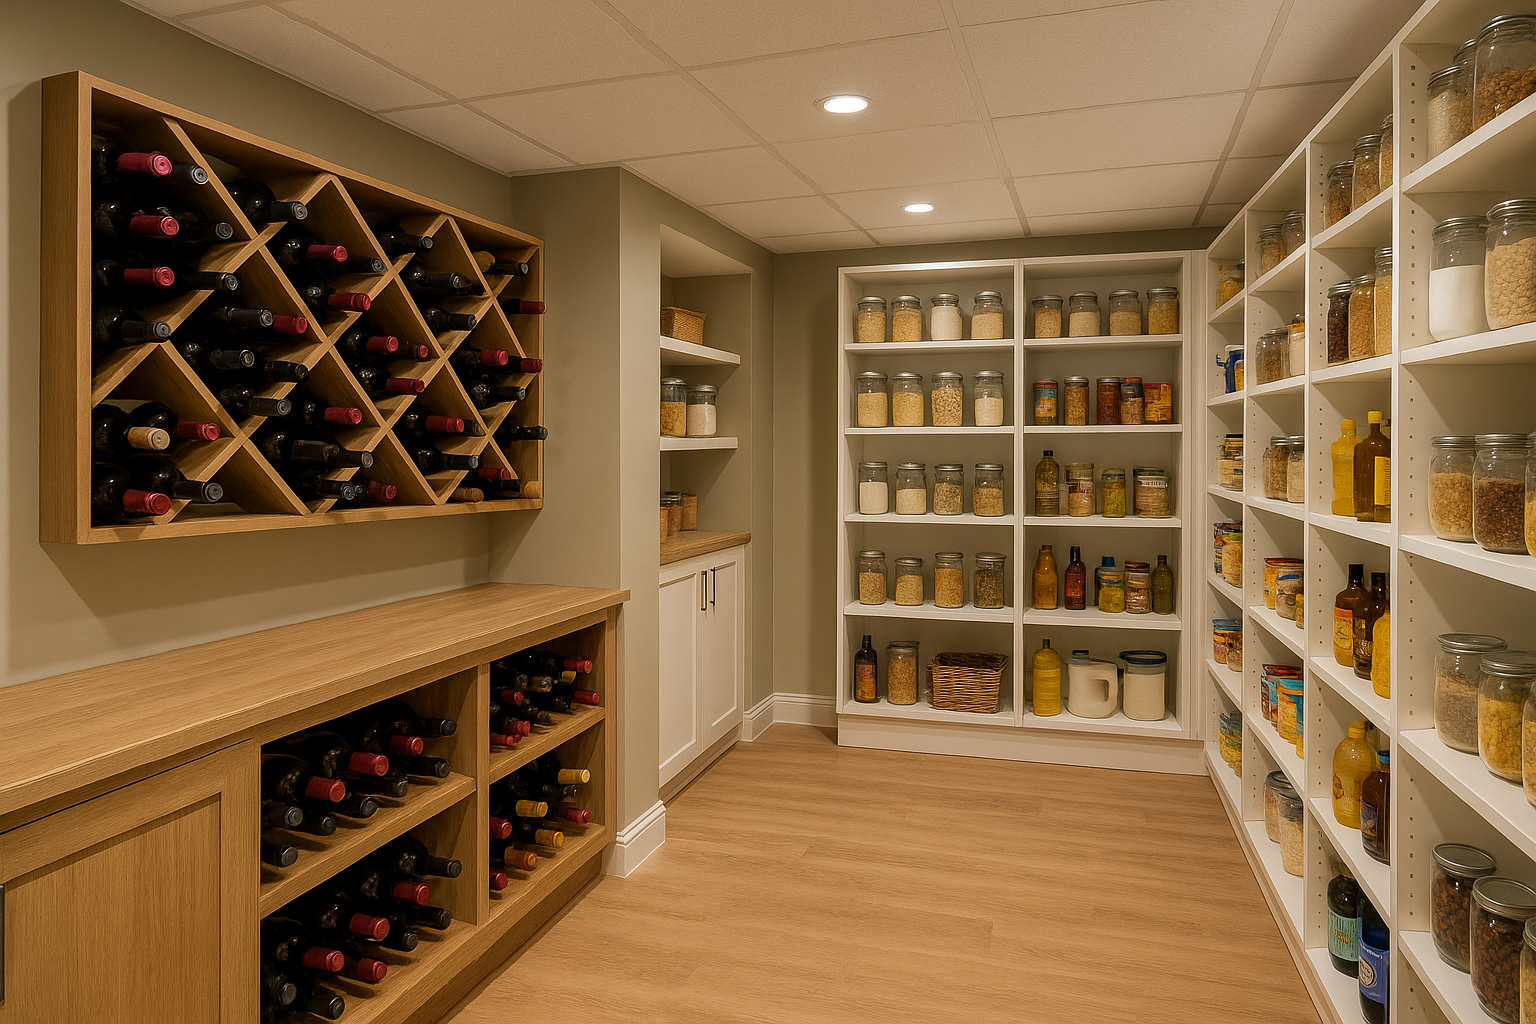
Why it works: Combining a wine collection with pantry storage turns your basement into a functional bar and elegant space. Wood racks keep bottles angled properly; shelves hold jars of pasta, grains or preserves. A basement’s stable temperature is ideal for wine and canned goods. Use glass jars or baskets to keep everything tidy.
Cost & considerations: Basic wine racks start at $100; custom wine cellars can run $5,000 or more. Pantry shelves cost $20–$50 per linear foot. Factor in moisture control and consider installing a small dehumidifier to protect corks and food. Check local building codes for ventilation requirements when storing food long‑term.
Cost breakdown
Because storage projects often tie into larger basement remodels, it’s helpful to understand typical ranges. Finishing a whole basement in Chicago including storage, flooring and walls—can cost $40,000–$100,000 and take 8–16 weeks. Within that, storage solutions range widely:
-
Freestanding shelves and bins: $200–$1,000 for multiple racks and bins.
-
Built‑in cabinets or benches: $250–$600 per linear foot, depending on materials and customization.
-
Custom closets or mudroom lockers: $500–$5,000+.
-
Wine cellars or specialty storage rooms: $1,000–$10,000+, depending on climate control and materials.
Labor is often around 50% of the total cost of home improvement projects, so building yourself can reduce expenses if you have the skills. Don’t forget permit fees when adding walls, electrical or plumbing.
Common problems & how to avoid them
-
Moisture & Mold – Basements tend to be damp. Before adding shelves or cabinets, waterproof walls and floors and install a dehumidifier. Use moisture‑resistant materials like PVC or wire shelving. Avoid storing cardboard boxes directly on concrete floors.
-
Low Ceilings & Tight Spaces – Built‑in cabinets or hanging racks can reduce headroom. Measure carefully and ensure you maintain at least 7 feet of clearance as required by many codes. In low areas, stick to floor cabinets and under‑stairs solutions.
-
Access to Utilities – Don’t block electrical panels, sump pumps, HVAC components or plumbing cleanouts. Use movable shelves or leave clearance for service. If you install wine racks or cabinets near water lines, ensure they can be removed for repairs.
-
Pests – Stored items can attract rodents and insects. Use sealed plastic bins, clear out clutter regularly and monitor for signs of infestation. Keep food in airtight containers and maintain proper basement ventilation.
-
Overloading Shelves – Exceeding weight limits can cause shelves to sag or collapse. Follow manufacturer instructions for load capacity. Use heavy‑duty anchors into studs or masonry for wall‑mounted racks, and store heavier items on lower shelves.
Step‑by‑step planning process
-
Assess the space: Measure ceiling height, wall lengths and any obstacles like columns or mechanical systems. Check moisture levels and repair leaks.
-
List your needs: Identify what you need to store (e.g., seasonal décor, sports gear, pantry goods) and how often you’ll access each item.
-
Choose storage types: Select from the ideas above based on your needs, budget and ceiling height. Mix options (e.g., pegboard for tools plus cabinets for toys).
-
Set a budget: Include materials, labor, permits and contingency. Remember that finishing an entire basement can cost $40k–$100k, but simple shelving or racks may be a few hundred dollars.
-
Check permits: Permits may be required if you add walls, electrical outlets or plumbing. Basement remodels must meet code for egress windows, ventilation and ceiling heights. Contact your local building department.
-
Order materials: Long‑lead items like custom cabinets or wine racks can take weeks. Plan your timeline accordingly.
-
Prep the area: Seal and paint walls, address moisture, and install a vapor barrier if necessary. Clear the area and mark stud locations for wall‑mounted units.
-
Install storage: Follow manufacturer instructions for racks and shelves. Use a level and studs or masonry anchors to ensure stability. For built‑ins, build frames, attach to studs, then add doors, drawers or shelves.
-
Organize & label: Use clear bins, baskets and labels to categorize items. Keep frequently used items at eye level and seasonal items higher or lower.
-
Maintain: Periodically declutter, check for moisture and pests, and adjust systems as your needs change.
Materials & design options
-
Shelving: Wire shelving (ventilated, affordable), solid wood (warm, custom sizes), metal or PVC (moisture‑resistant), adjustable track systems (flexible).
-
Bins & Baskets: Clear plastic bins for visibility, woven baskets for aesthetics, labeled totes for seasonal items.
-
Cabinetry: Stock cabinets (budget-friendly), semi‑custom (more finishes), custom (fits odd spaces).
-
Hardware: Soft‑close hinges, full‑extension drawer glides, adjustable shelf pins.
-
Finishes: Paint cabinets and shelves to match your basement décor; seal wood surfaces to prevent moisture damage.
-
Lighting: Overhead cans, LED strips under shelves, motion‑sensor lights inside closets for convenience.
Questions to ask before hiring a contractor
-
Scope: What storage solutions will you install (cabinets, closets, shelving, racks)?
-
Materials: What brands or materials do you recommend for basement humidity?
-
Permits: Will you handle any necessary permits and inspections?
-
Moisture Control: How will you address existing moisture or drainage issues?
-
Timeline & Cost: How long will the project take, and what’s included in the estimate?
-
Access: How will we maintain access to mechanical systems like electrical panels and sump pumps?
-
Warranty: What warranties do you offer on materials and workmanship?
-
References: Can you provide photos or references from previous basement storage projects?
Conclusion & next steps
A well-organized basement makes every day smoother. By investing in smart storage like under‑stairs closets, built‑in cabinets, floating shelves, benches, overhead racks, wire shelving, pegboards, mudroom lockers, bike racks and wine cellars you can maximize space and keep clutter at bay. Plan carefully, tackle moisture first, check codes and budget for labor and materials. Then watch your basement transform into a functional, tidy part of your home.
Ready to create your dream storage space? Get a free basement storage quote and start turning chaos into order.